Hawkeye Firefly Split V6-PRO - A comprehensive review
In this article, I show you a comprehensive review of a surprising, little camera. I was scrolling my Instagram feed, and Hawkeye’s reels kept showing up, showing their latest 6K/30 FPS-capable camera module, the Firefly Split V6-PRO. I was impressed by the image quality of the clips, and what particularly struck me was the fact that they use a 1-inch type Sony sensor in the camera. So, I got a camera from them and I put it under a detailed inspection. My main idea is to use it in my optical microscope, but due to its great image quality and ease of use, I also use it for other purposes. My main camera is an old Samsung Galaxy S9+, whose sensor is much smaller as well as the optics, and my secondary camera is an old Sony A6000, which surely has a bigger sensor, and I have a plethora of lenses for it, but it cannot record in 4K, which is sometimes more desirable.

Original packaging of the camera with foam padding
Package contents
The package came with the following devices and accessories:
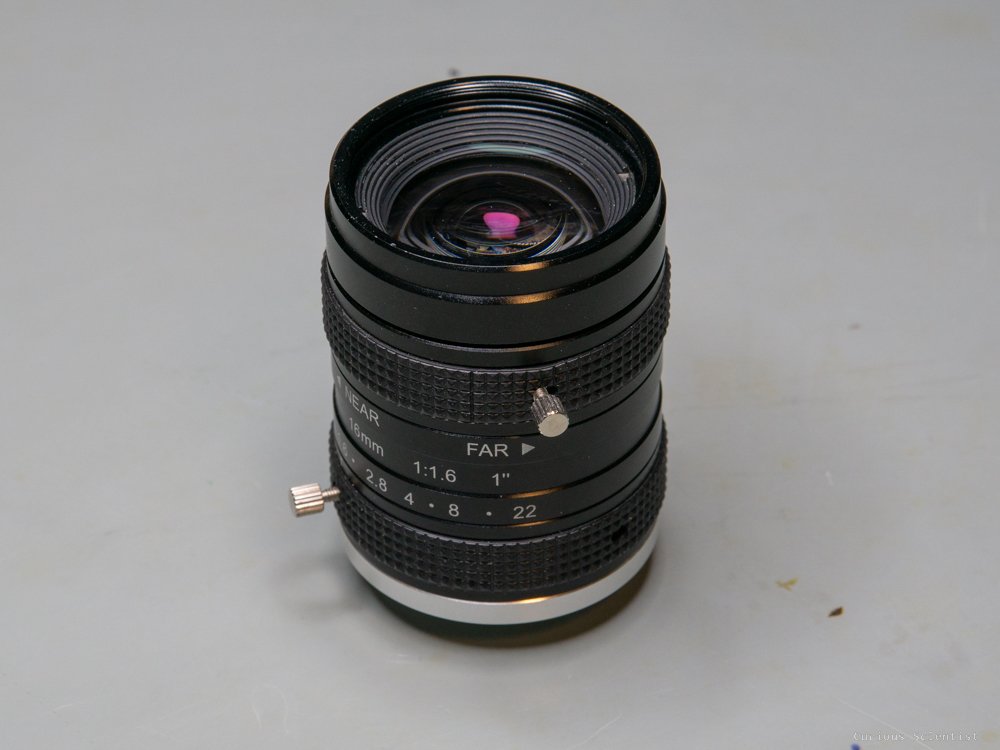
Mainboard with the FPV camera attached to it. The camera module has an M16, F2.8, 7G2P lens with 102° field of view
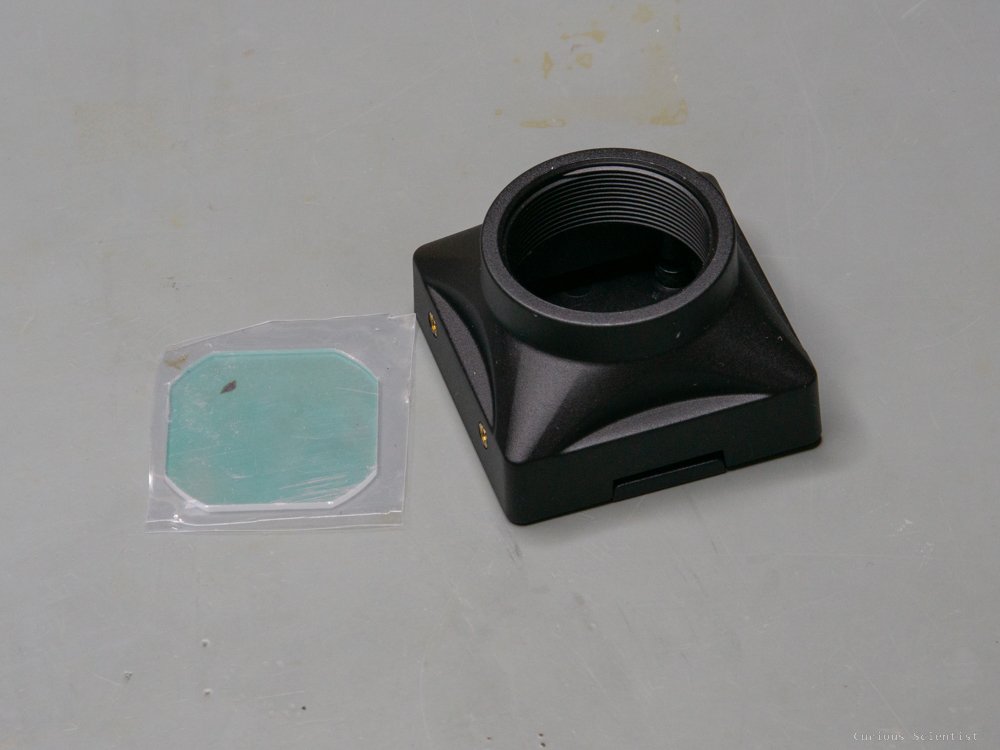
C-mount plastic enclosure with an IR filter lens
5-button remote for controlling the camera
Heatsink to keep the mainboard cool
2 sets of cables for the 5-pin connector
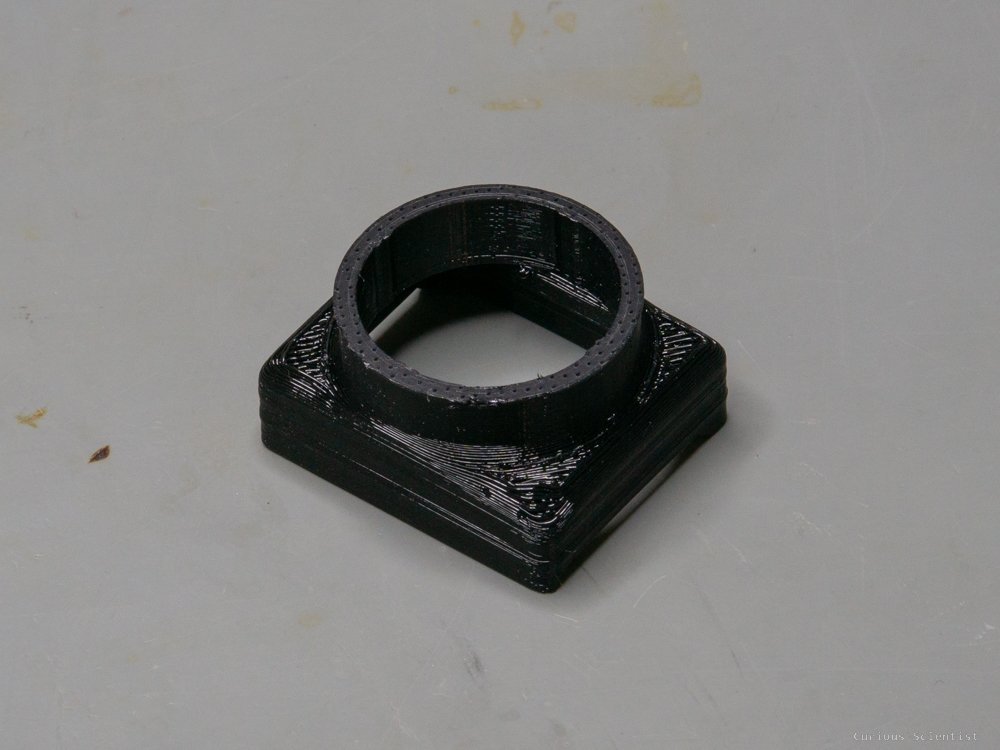
3D printed lens hood for the default lens
An additional 1 m long soft cable to connect the mainboard to the camera sensor module
An instruction manual with additional links to more details resources
Everything was packed neatly in a plastic box, padded with foam.
Introduction
So, as I mentioned in the intro, this camera packs a 1-inch Sony sensor, which is capable of recording in 6K/30 FPS. This is 5472x3072 resolution (16.8 Megapixels) with a 65 Mbps total bitrate when it is used in 16:9 mode. In 4:3 mode, the resolution becomes 5472x3648 (19.9 Megapixels) with a 25 FPS framerate. Of course, the device can deliver videos in lower resolutions as well, all the way down to full HD (1920x1080), typically in 30 FPS or 60 FPS mode as well. The video can be saved on an SD card (high-speed card is recommended!), and it can be sent to a computer via USB (USB stream mode) or to an external HDMI monitor via a micro-HDMI connector. Also, another option is to use the onboard 5-pin connector’s AV output pin (yellow cable) and send the video to a compatible device in PAL format. Finally, one can also connect to the device via WiFi using their application called okay and not only get the video on the phone display, but the app also allows the user to configure everything on the camera!
The camera module has different image stabilisation and horizontal locking features, which make it suitable for FPV applications.

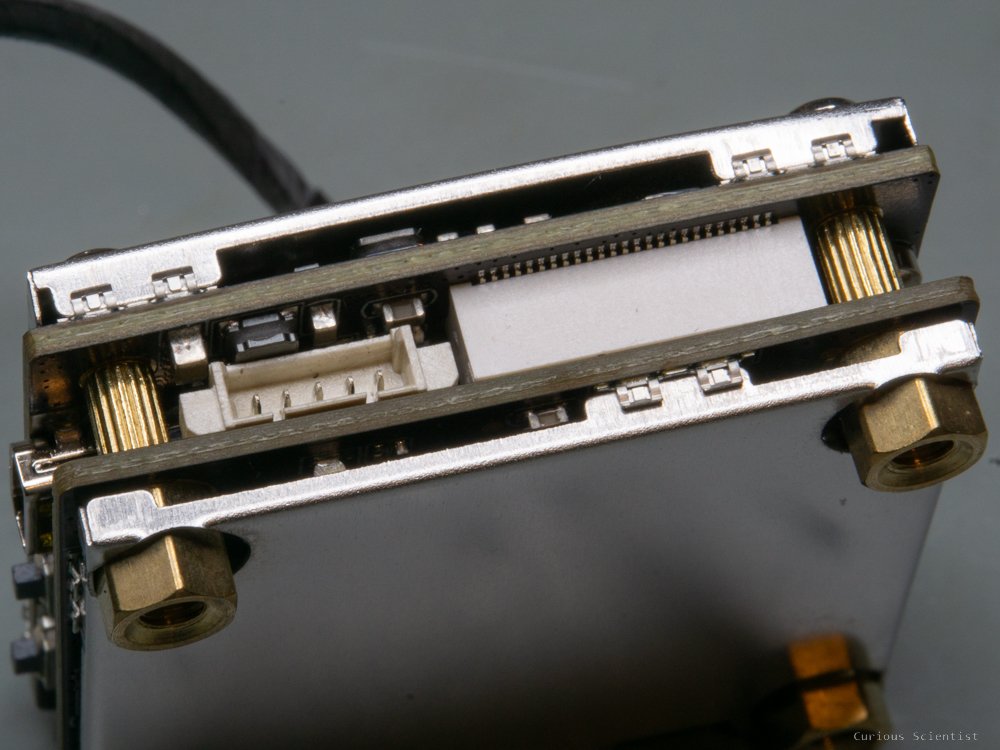
Exposed bottom side of the camera module. The battery terminals are at the bottom left corner next to one of the brass nuts.
The camera can be powered in three different ways:
Via the USB-C port. A powerful USB-C charger or a power bank is perfect for this purpose
Via the 5-pin connector (Red (+7-26 V DC), Black (GND))
Via a 1S Li-ion battery using the onboard port. However, this requires the user to remove the metal shell from the mainboard and manually solder the battery on the dedicated pins (see below)
The battery pins are easy to reach. We must carefully pry off the metal shield from the bottom (the side with the nuts and not the one with the screws!) side of the device. We will see a blue board which seems to be the WiFi board, and next to it a red component which I think is the WiFi antenna. At the same edge of the board, there are two solder tabs right next to one of the brass nuts. They are marked with “+” and “-” symbols. These are the connections for the lithium battery. I used a 2000 mAh battery for my module. I did not directly solder the battery on the board, but since the battery came with a connector, I soldered the connector to the board. This is very useful because we can then disconnect the battery from the board and use it with other power sources. When the battery is connected, it can be charged with the device. I tested it by connecting the device to a USB-C power supply. The nearly empty battery was charged within a few hours. The charging process is indicated by a red LED next to the USB-C connector. When the battery is full, the LED turns off.
Apart from the video recording capability, the device can also capture photos. It can go up to 50 Megapixels resolution, and it has almost all the options available as a proper camera:
Self timer (2 s, 5 s and 10 s)
Timelapse (2 s, 5 s and 10 s)
Adjustable exposure time, including long (more than 1 second) exposure times
Adjustable image quality, including RAW format
Adjustable white balance
Adjustable ISO up to 6400
Adjustable exposure value
Adjustable metering
The device also comes with a remote controller board. It is a very smart solution because the remote controller only has 2 wires; however, there are five buttons on it. I reverse engineered the board and I figured out that the buttons switch different parts of a voltage divider. I asked the manufacturer, who confirmed that the remote indeed uses this smart solution. The trick is to let different, distinguishable voltage levels drop through the resistor ladder when a certain button is pressed. Then this voltage is read by the onboard ADC and the voltage levels are matched with a corresponding function (up, down, OK, etc). This solution gave me an idea that I will implement as a future improvement for the remote controller.
Apart from the remote controller, the device has two onboard buttons. The one closer to the micro-HDMI connector is the WiFi ON/OFF button. If we press and hold it for 2 seconds, the device turns on its WiFi and we can connect to it. The active WiFi is indicated by a quickly flashing onboard LED. Turning off the WiFi is done by pressing and holding the same button for 2 seconds. The other button closer to the corner of the board can be used to start/stop recording, or snapping a picture, depending on the active mode. But if it is pressed and held for 2 seconds, then the device can be turned ON/OFF. This is good when we want to charge the connected battery, but we don’t want to get the device running its processor and becoming very hot.
Video performance, image quality
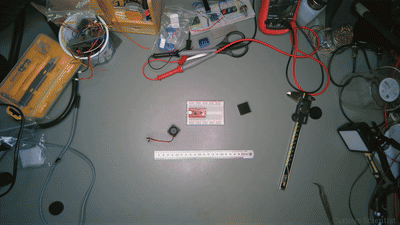
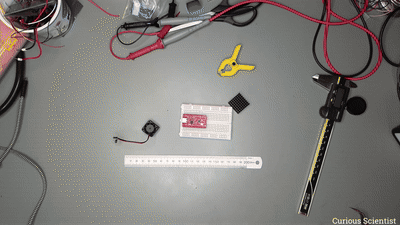
I did some rudimentary tests using the default lens of the camera. I used the camera indoors at my desk in the same conditions as I would use my Samsung Galaxy S9+, which is my “main camera” for recording YouTube videos. So, basically, I used the camera as an overhead camera and did different tests. Since the Hawkeye does not have autofocus, I just twisted the lens in the housing (manual focus!) until I got a sharp image on the surface of the desk. Then I recorded in 6K (16:9) setting and used the digital zoom to fully zoom in. I put a ruler and my CH32V006K8U6 development board at the centre of the image to see how good the camera resolves the features. Then I also did the same with my mobile phone and fully zoomed in using its digital zoom.
I let the GIFs on the side speak, but I must say that the Hawkeye has an impressive image quality even at max digital zoom, especially when compared with my phone. A few years difference in technology, yes, but also a large difference in sensor size (1” vs 1/2.55”)! Also, at the beginning of the clips, we can see the FOV differences between the two cameras (lenses). The default lens of the Hawkeye camera has a 107° FOV, whereas the phone has 77°. It is a noticeable difference. However, I must note that while the Samsung has a sharp picture across the whole frame, the Hawkeye has noticeable optical distortion towards the edge of the picture. But this is somewhat expected since these large FOV lenses always distort the image around the edges.
Hawkeye’s FOV and digital zoom
Samsung Galaxy S9+ FOV and digital zoom.
I also tested the JPEG image quality at minimum and maximum ISO levels. I wanted to test the RAW images as well, but unfortunately, I can’t open the camera’s RAW files in Lightroom. They provide an .exe file to open the RAW images, but I did not feel like taking the risk of running an “unknown” .exe on my computer. I also tried to open it with several online RAW viewers, but none of them worked. Maybe later.
Regarding the image quality, both images look good, but it is very obvious that the ISO 100 looks much clearer and nicer. But even at ISO 6400, which is the maximum ISO level we can use both for still images and videos, the image quality is fairly good.
Under the same light conditions, the camera used a 1/30 s shutter speed at ISO 100, and a 1/3200 s shutter speed at ISO 6400. In both cases, I used the maximum aperture of f1.4 of the attached lens. So, if we can sacrifice some decrease in image quality, then we can increase the ISO quite a lot and have, for example, very short shutter speeds. Increasing ISO to 400-800 does not cause a very noticeable decrease in image quality.
For fun, I also took a picture of the same scene with my Ricoh GR II camera. The Ricoh can only go down to f2.8, but it has a larger, APS-C sensor. This shows very well in the colours and noise levels. The Ricoh has somewhat better image quality. Also, due to the sensor size, even with a larger aperture, the depth of field is much narrower than that of the Hawkeye camera. Yet, the Hawkeye’s image quality is not that far from Ricoh’s.

Ricoh GR II at ISO 400 and f2.8 (left) and Hawkeye at ISO 100 and f1.4 (left).
ISO 100 (brighter) vs ISO 6400 (darker). I know, a GIP won’t really give back the differences due to compression.

100% cropped comparison of ISO 100 and ISO 6400 images
Image stabilization
I tested the image stabilisation with some handheld shots. I held the camera in my hands with a large 7” monitor attached to it. The image was more stable for sure, but I did not get the same result as with a GoPro or similar camera, but I think that is not the point here. Also, since primarily, this is an FPV camera, it should be attached to a gimbal, which would reduce/remove most of the vibrations and movements. If I’d walk or pan with my Ricoh, I would get worse results.
On the other hand, I am more impressed by the horizon locking feature. It really works well, and if I roll the camera, the image still stays locked and straight. I saw this feature in action cameras, and I think it is nice that this camera also has it.
Walking with the camera with no EIS
Walking with the camera with max EIS
Final thoughts
I think this is a fantastic camera module and it could open a lot of potential, especially because the manufacturer seems to care about the camera and they are continuously working on new firmware. It is already providing very good images with the default lens, but its real potential is with the C-mount enclosure. Having C-mount lenses in front of this 1-inch sensor opens up a lot of possibilities, especially for videography, considering that the camera is capable of recording 4K/60FPS or even 6K/30FPS footage. Keep in mind that many super popular cameras have this type of sensor. For example, the Sony RX100 series packs a similar sensor, and they are known for their good performance.
If the RAW editing becomes more flexible in the future, I think it will also be good for taking pictures. Nevertheless, the regular JPEG files are also good enough, and one can adjust many parameters before taking a picture, so the lack of (good) RAW support is maybe not that painful.
Also, one potential application which is most interesting for me stems from the sensor size and video resolution. I have been taking videos of microchips under a microscope with my Sony A6000 mirrorless camera. It is a great camera with a large APS-C sensor, but it does not support 4K resolution, which sometimes would be more desirable than a large APS-C sensor. So, I will also adapt this camera for my optical microscope, and I will use it to record, hopefully, amazing footage of different microchips and other components. But this is for another article and video.

Camera kit with the additional 2000 mAh battery.
Additional resources
Get the relevant parts using my affiliate links:
Hawkeye Firefly Split V6 Pro camera