MAX31855 - A better thermocouple module
In this video I show you how the MAX31855 thermocouple module works. I talk about the connections, the wiring and of course the coding. I also show some tricks and tips about the bit shifting and bitwise operations which can become handy when you need to work with large amount of bits or you want to read a specific part from your binary number. This module is really nice because it supports negative temperatures and its measurement range is also really broad.
If the module gives weird readings, put a 10 nF capacitor between the input pins of the thermocouple!
Schematics
The circuit is simple. The main unit is an Arduino Nano. The 16x2 LCD uses the i2C connection (A4: SDA, A5: SCL) and the power supply is +5 V. The MAX31855 thermocouple module uses SPI (CS: D10, SO: D12, SCK: D13) and the power supply is +3.3 V! Pay attention that the power supply is +3.3 V for the thermocouple module.
Arduino source code
//!!!!!!!!!!!!!ATTENTION THIS CHIP WORKS WITH 3.3 V!!!!!!!!!!!!!!!!!
//16x2 LCD
#include <LiquidCrystal_I2C.h> //SDA = B7[A4], SCL = B6[A5] STM32/[Arduino]
LiquidCrystal_I2C lcd(0x27, 16, 2); //16 blocks, 2 lines

//--------------------------------------------------------------------------------
#include <SPI.h> //SPI communication

uint32_t rawData = 0; //raw value coming from the thermocouple (long because the 32 bits)
uint32_t rawTC = 0; //raw data of the thermocouple
uint32_t rawInternal = 0; //raw data of the internal temperature sensor
float TCCelsius = 0; //Celsius degrees of the thermocouple
float intCelsius = 0; //Celsius degrees of the internal thermometer

const byte CS_pin = 10; //chip select pin

void setup()
{
  pinMode(CS_pin, OUTPUT); // define chip select as an output
  digitalWrite(CS_pin, HIGH); //pull chip select low
  SPI.begin(); //start SPI
  Serial.begin(115200); //start serial

  //------------------------------------------------------
  lcd.begin();                      // initialize the lcd
  lcd.backlight();
  //------------------------------------------------------
  lcd.setCursor(0,0); //Defining positon to write from first row, first column .
  lcd.print("MAX31855");
  lcd.setCursor(0,1); //Second row, first column
  lcd.print("Thermocouple");
  delay(3000); //wait 2 seconds

  lcd.clear(); //clear the whole LCD

  printLCD(); //print the stationary parts on the screen
  //------------------------------------------------------

}

void loop()
{
  readThermocouple(); //read the thermocouple
  delay(1000); //typical conversion time is 70-100 ms, choose delay accordingly
  refreshLCD(); //refresh the values
}

void printLCD()
{
  //These are the values which are not changing during the operation
  lcd.setCursor(0,0); //1st line, 1st block
  lcd.print("Internal:"); //text
  //----------------------
  lcd.setCursor(0,1); //2nd line, 1st block
  lcd.print("External:"); //text
}


void refreshLCD()
{
  //These are the values which are changing during the operation
  lcd.setCursor(10,0); //1st line, 10th block
  lcd.print("     "); //delete display
  //- It is always a good idea to overwrite the previous numbers with whitespaces
  lcd.setCursor(10,0); //1st line, 10th block
  lcd.print(intCelsius); //internal thermometer value
  //----------------------
  lcd.setCursor(10,1); //2nd line, 10th block
  lcd.print("     "); //delete display
  lcd.setCursor(10,1); //2nd line, 10th block
  lcd.print(TCCelsius); //converted value (thermocouple)
}


void readThermocouple()
{
  //bits
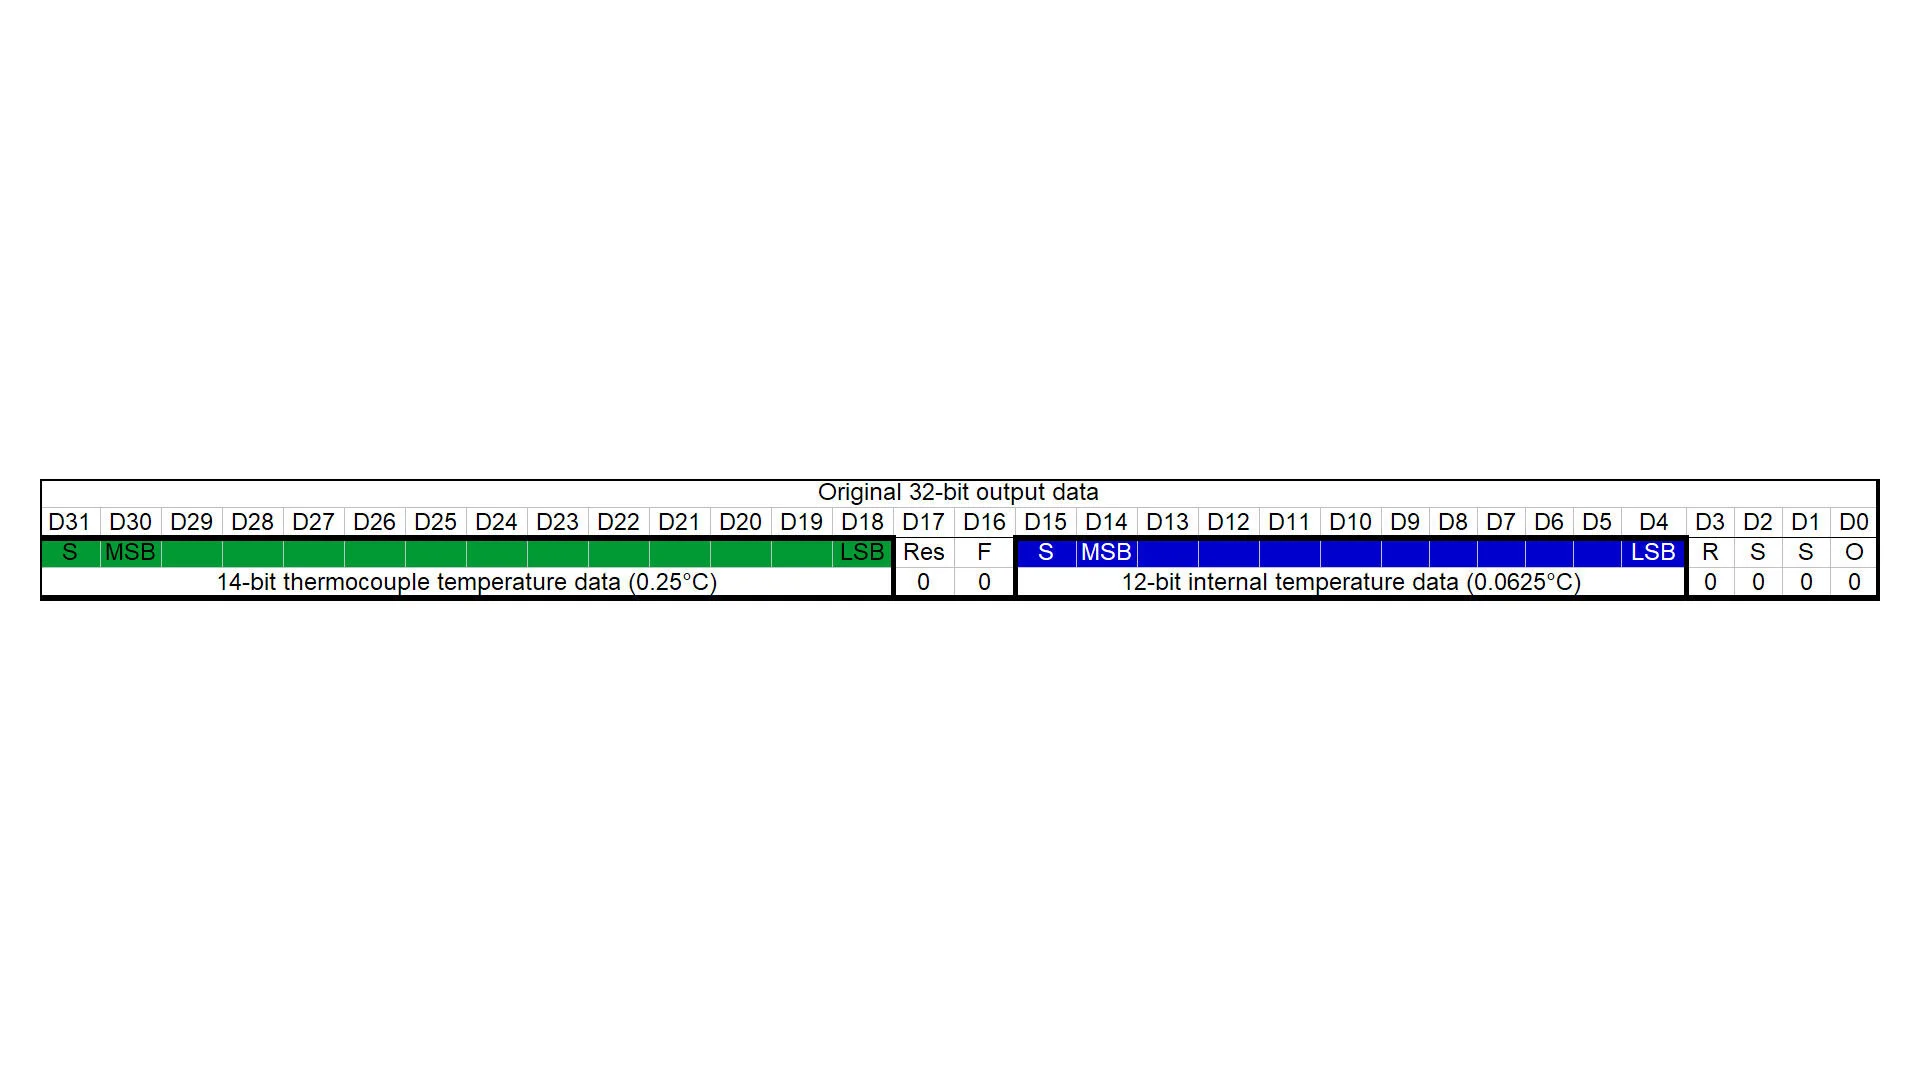
  //D31-D18: 14-bit thermocouple temperature data
  //D17: Reserved
  //D16: Fault bit
  //D15-D4: 12-bit internal temperature data
  //D3: reserved
  //D2: SCV, D1: SCG, D0: OC

  //Set everything to zero to avoid confusion
  rawData = 0;
  rawInternal = 0;

  digitalWrite(CS_pin, LOW); //"Force CS low and apply a clock signal at SCK to read the results at SO"
  SPI.beginTransaction(SPISettings(14000000, MSBFIRST, SPI_MODE0)); //standard Arduino SPI

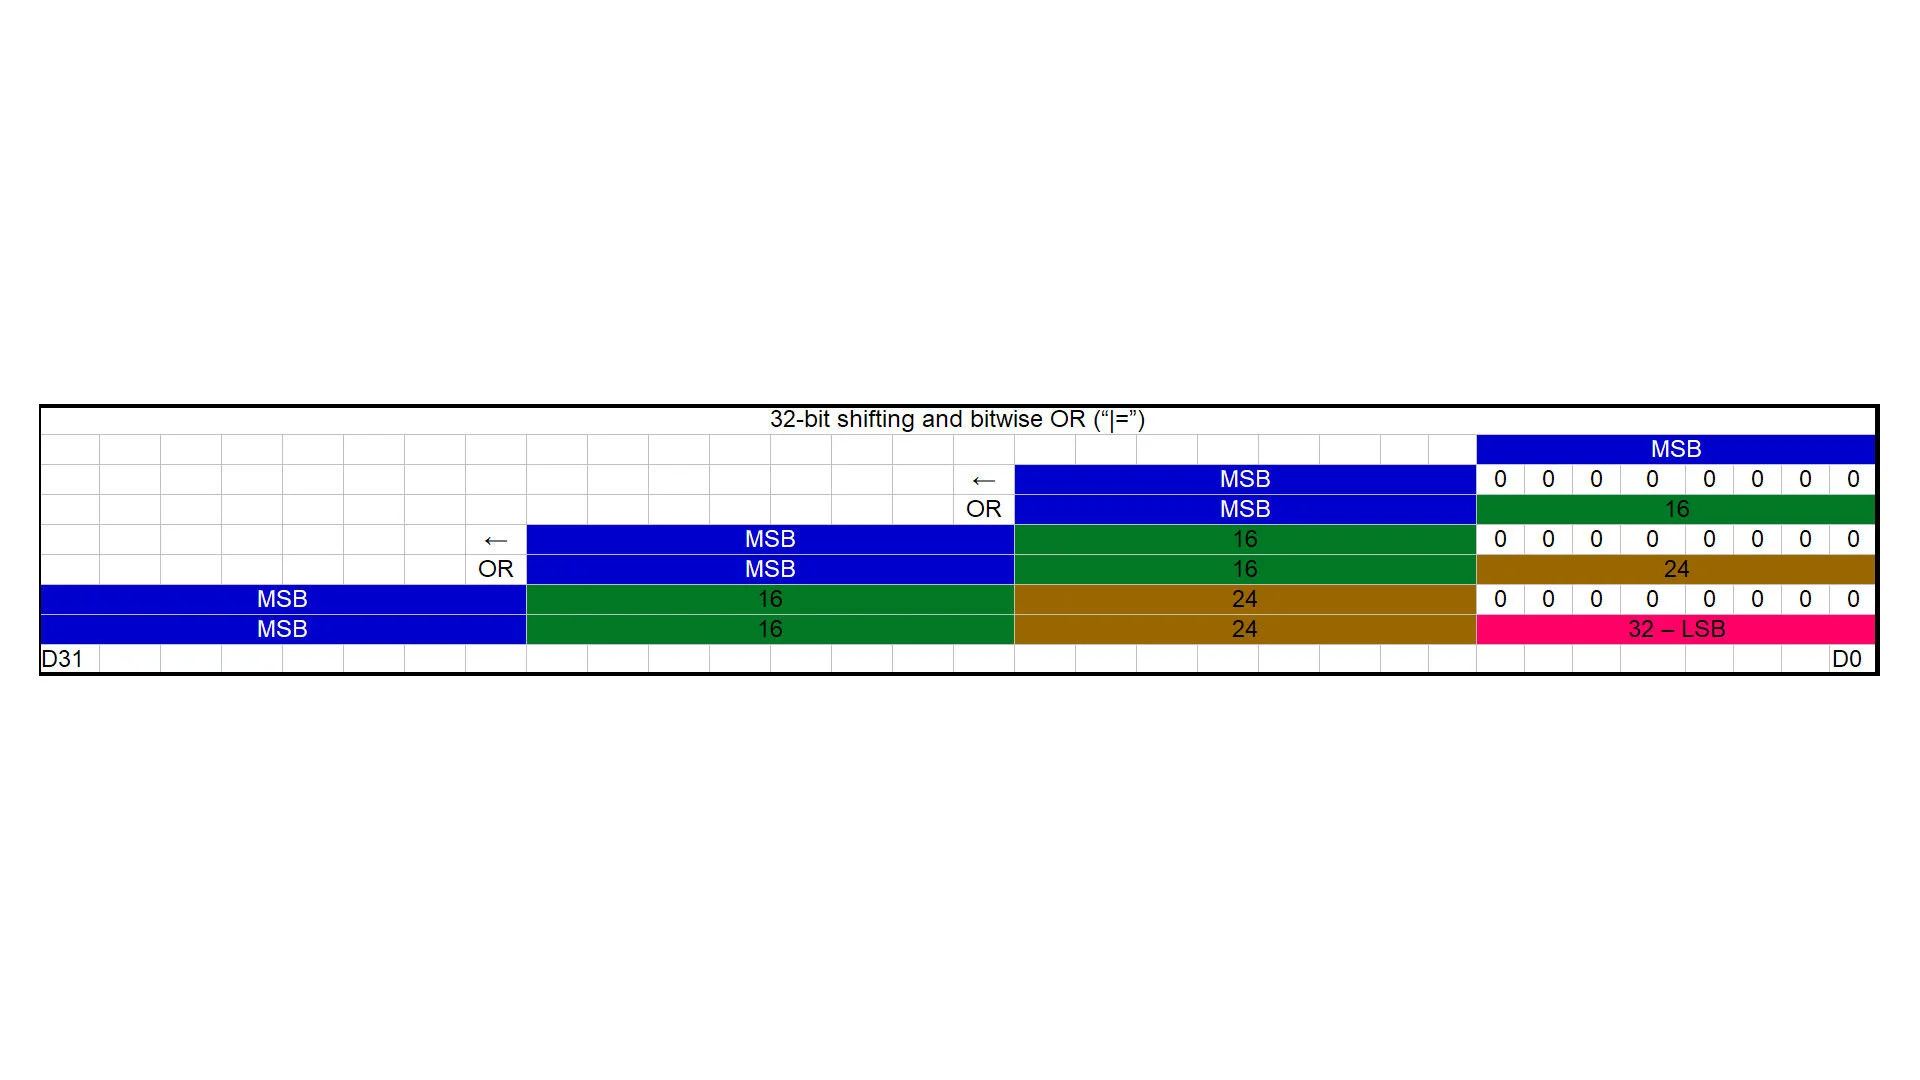
  //I borrowed the same strategy I used for the ADS1256 where I needed to put together a 24-bit number:
  rawData = SPI.transfer(0);  //MSB comes in, first 8 bit is updated // '|=' compound bitwise OR operator
  rawData <<= 8;              //MSB gets shifted LEFT by 8 bits
  rawData |= SPI.transfer(0); //16 comes in
  rawData <<= 8;              //Shifting
  rawData |= SPI.transfer(0); //24 comes in
  rawData <<= 8;              //Shifting
  rawData |= SPI.transfer(0); //32 - LSB

  SPI.endTransaction(); //close down SPI transaction
  digitalWrite(CS_pin, HIGH); //We finished the command sequence, so we switch it back to HIGH

  Serial.print("Raw: ");
  Serial.println(rawData); //print 32-bit raw data
  Serial.print("Raw-bytes: ");
  Serial.println(rawData,BIN); //print 32-bit raw data in binary format
  //example output:1|10011000|00011011|00000000 (numbers are "missing" because I read RT)

  //create the 12-bit internal temperature number
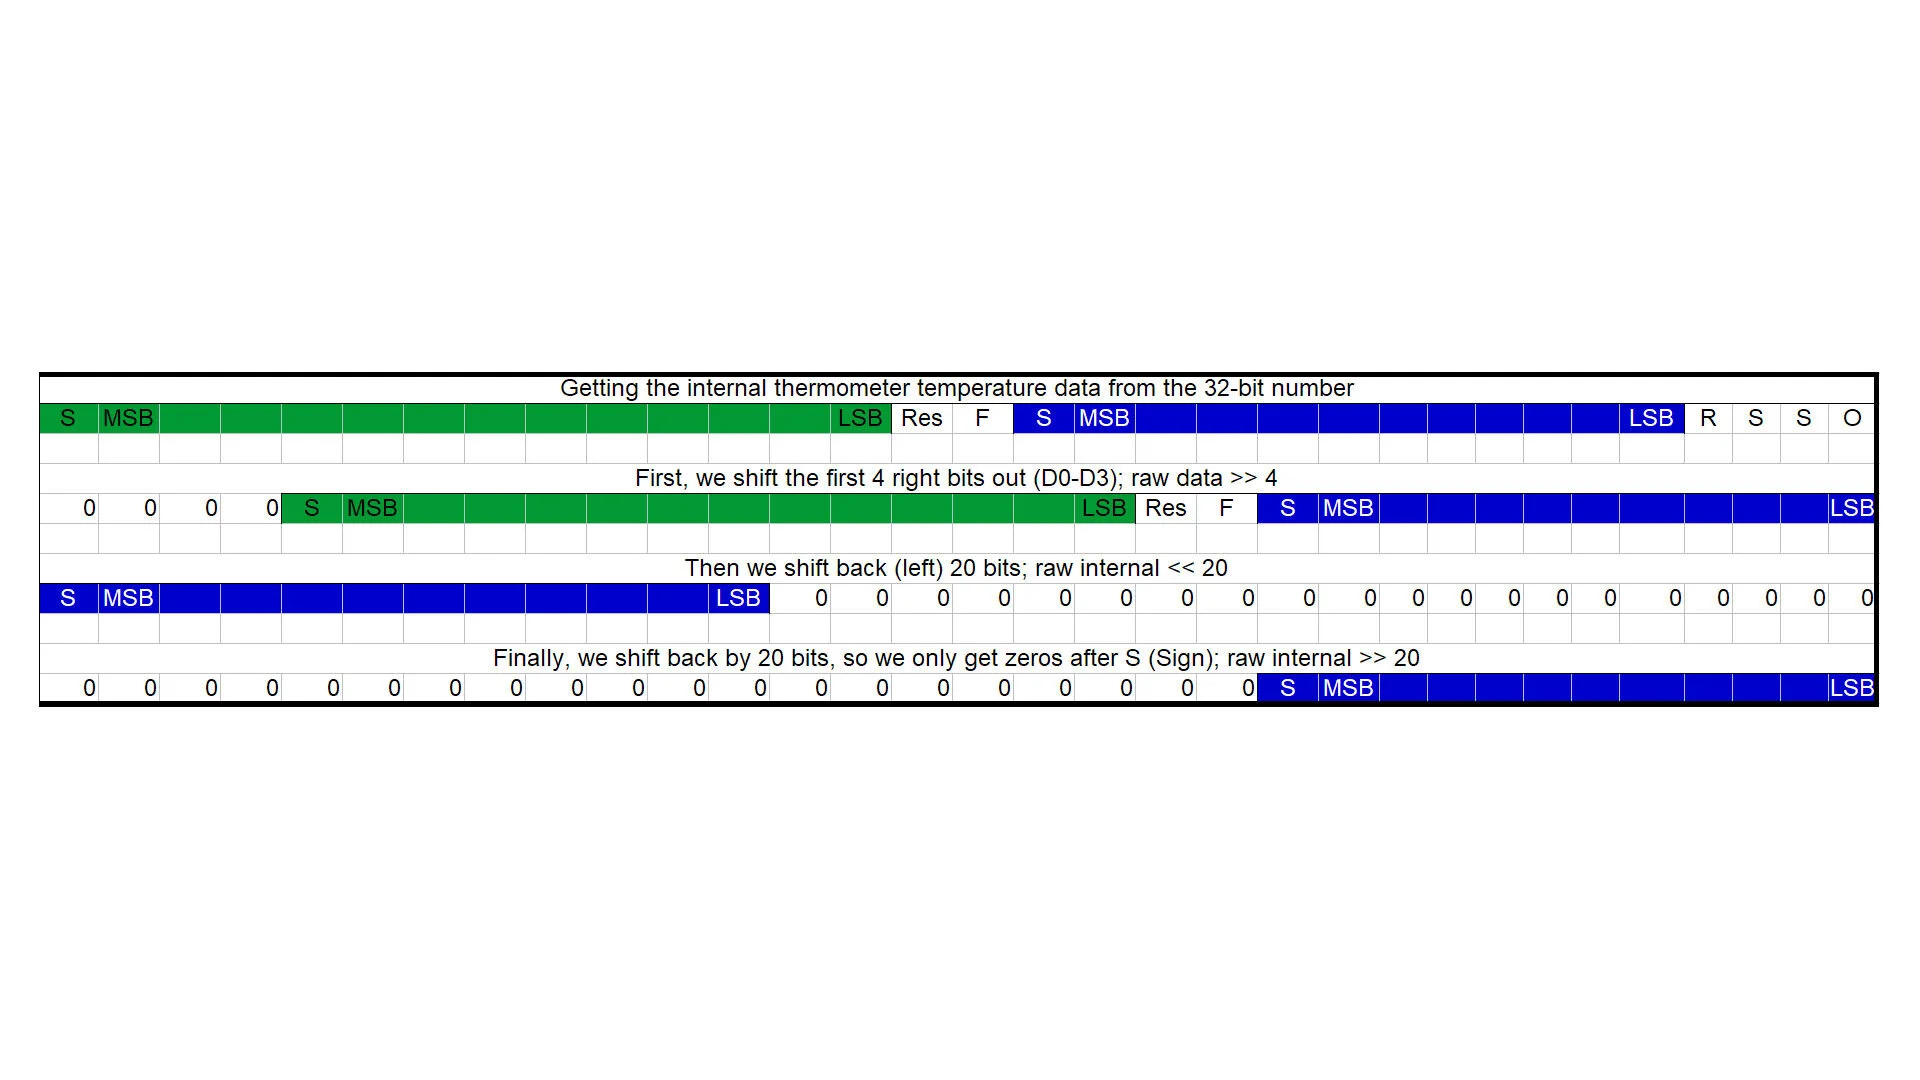
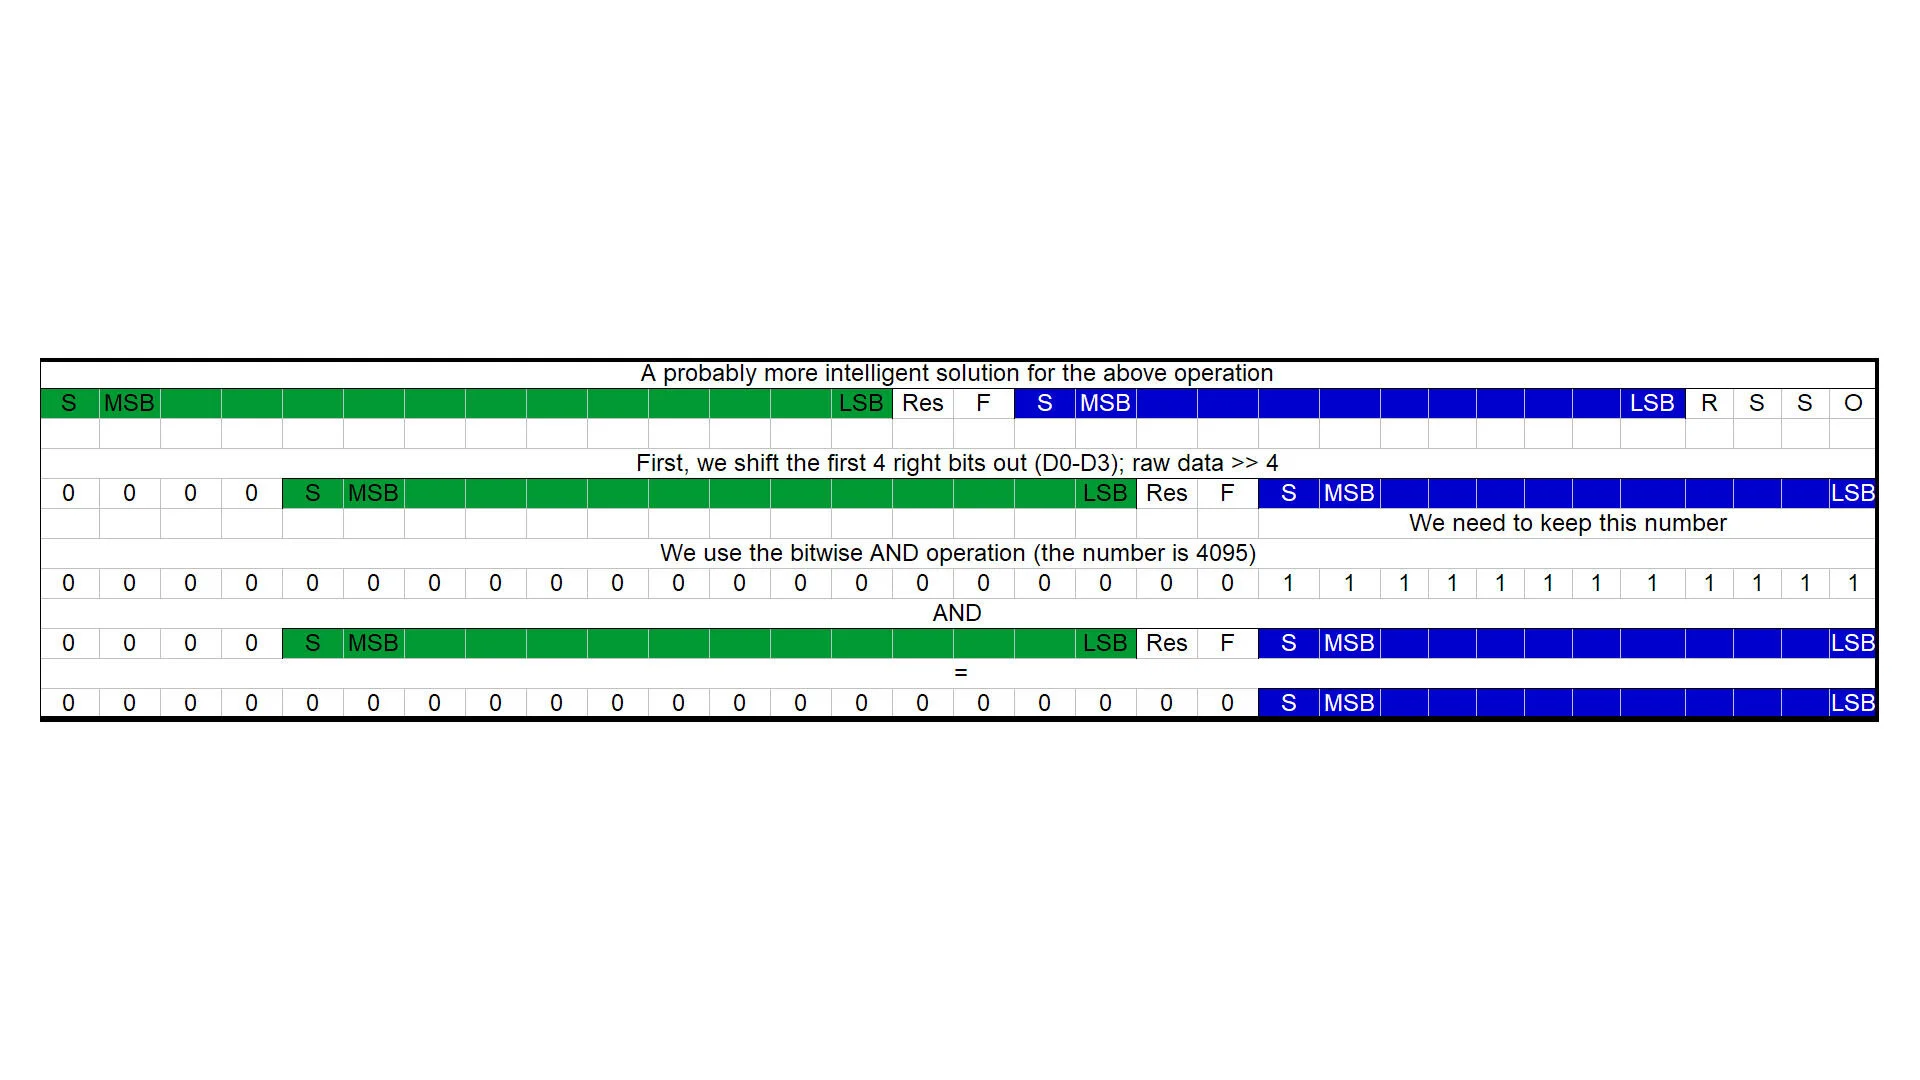
  rawInternal = rawData >> 4; //shifts out the D0-D3
  //This is the "uglier solution"
  //rawInternal = rawInternal << 20; //shifts out the D17-D31
  //rawInternal = rawInternal >> 20; //places the number to its correct place

  //Alternative / nicer solution
  rawInternal = rawInternal & 4095; //4095 = B00000000000000000000111111111111

  Serial.print("Raw-internal temp: ");
  Serial.println(rawInternal, BIN); //print 12-bit raw internal temperature data in binary format
  //Calculate the temperature in Celsius
  intCelsius = rawInternal * 0.0625; //datasheet page 4
  Serial.print("Internal temp: ");
  Serial.println(intCelsius); //print 12-bit Celsius data

  //create the 14-bit (signed) thermocouple number
  rawTC = rawData >> 18; //shifts out the D0-D17
  //taking care of the sign
  if(rawTC >> 13 == 1) //of the 14th bit is 1
  {
    rawTC = rawTC - 16384; //conversion of negative numbers
  }
  Serial.print("Raw thermocouple 14-bit temp: ");
  Serial.println(rawTC); //print 14-bit raw data
  //Calculating the temperature in Celsius
  TCCelsius = rawTC * 0.25; //datasheet page 4
  Serial.print("Thermocouple temp: ");
  Serial.println(TCCelsius); //print converted data
}
Resources for bit shifting and bitwise operations


