DWIN Displays - Setting up the display
In this video, I show you how to set up DWIN displays for a basic operation. I created this video and article mainly because I don’t want to explain the same things at the beginning of all of my videos in the DWIN Display Tutorial video series. After watching this video and understanding its contents, you will be able to create and upload content to your DWIN displays.
First, you will need to download the developing environment from DWIN’s website. The tool is called DGUS. Always make sure that you grab the most recent version of the tool. The tool still seems to have a lot of issues (as of 28th January, 2023) and it crashes sometimes, so I believe that DWIN is constantly working on improvements.
The downloaded zip file is basically the portable version of the software, so you just need to unpack it somewhere and you can use it immediately.

New project window
Once you opened the DGUS software, you need to create a new project. Click New in the File menu, then select the path for your project folder and select the resolution of the display. Pay attention to the alignment of your display! If your display’s resolution is 480X800 and you want to use it in portrait mode, you have to define the resolution as 480X800. But if you use the same display in landscape mode, the resolution should be 800X480.
Now the project is ready and saved. First, let’s create an image which will serve as the user interface. In this example, I use the display in landscape mode which means that the picture I create has to be 800X480. Make sure that when you save the image, the file name of the first page (even if it is the only page) starts with “00”. For example, “00_dwin_firstPage.jpg” for the first page, “01_dwin_secondPage.jpg” for the second page, and so on. The first two digits in the file name help the display identify the pages and their order. Once the image is created, we can load it into the editor so we can place different touch controls over it. Since we are already working with the background image, let’s also package it into one of the files which will be uploaded to the display.

Tool page on DWIN’s website
On the welcome tab, open the DWIN ICL Generator link, then click the Select Pictures button. Here, load the same picture that you loaded in the Images View tab previously. If you have multiple pages, then you just select all of them. Now press the Generate ICL button at the bottom. When you click the button, a new window pops up and it is asking for the path and file name. Save the file in the project’s DWIN_SET folder with the filename “32.ICL”.

DGUS Config tool
Then still within this ICL Tool window, navigate to CFG Edit at the top. Here we need to set 3 important parameters.
First, we need to set the Touch-sensitive Variable Changes Update to Auto. This allows the display to send an update to the serial port when you interact with the display. Then set the Power-on Display Direction to your preferred orientation. If you use the display with an Arduino using the software serial library, change the baud rate to 9600.
Finally, if you are bothered by the beeping sound when you touch the display, change the Touch Sound to Off.
Now click the New CFG button and save the file in the DWIN_SET folder as “T5LCFG.ICL”.

ICL Tool page

CFG Edit page
We can close the window and open the 0# word bank generating link in the DGUS config tool area. The font editor is used to create font sets which are later used to display characters on your DWIN display. You can create multiple font files and you can refer them to different controls on your DWIN display. Select your preferred font, then select a wide character, for example, G, M or W. Then adjust the scale and shift values until all letters fit their frames properly. Then press Create 0_DWIN_ASC.HZK. When the process is finished, open your file browser and go to the folder where your DGUS executable file is located. You will find the freshly created font file here. Copy it over to your project’s DWIN_SET folder.
Now go to the File menu and click on Generate. This will create three additional files directly in the project’s DWIN_SET folder.
Now your DWIN_SET folder should contain the following files:
0_DWIN_ASC.HZK
32.ICL
T5LCFG.CFG
13TouchFile.bin
14ShowFile.bin
22_Config.bin

0# word bank generating - Font generator tool
We need to copy these files over an SD card to be able to upload the to the screen. So grab an SD card with a maximum size of 16 GB (32 GB or larger won’t work). We need to format the card with a specific command in order to create the appropriate file system on it.
Open the Command prompt (press the Windows button on your keyboard, then enter cmd) and enter the following line:
format/q j:/fs:fat32/a:4096
Replace the drive letter “j” with the drive letter of your SD card, then press enter and proceed with the steps showing up on the terminal. When you finished, copy the whole DWIN_SET folder onto your SD card.
Grab the SD card and insert it in the display’s SD slot. The display should be off at this moment. Then, turn on the display and wait for the code to upload. A blue display will show up when the software is being updated and when it is finished, the second line on the display will say
SD Card Process… END !
Now remove the power from the display and remove the SD card. Do not attempt to remove the SD card while the display is powered as it can lead to issues.
If you followed the tutorial carefully, now you have a working display and you know the basics about how to create the config files and upload them on your DWIN display.
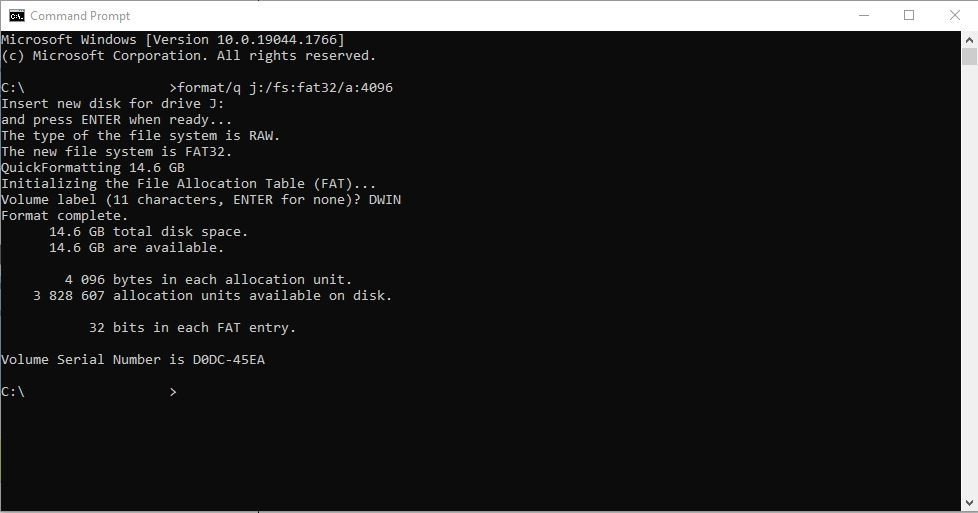
Command prompt showing the formatting procedure.
Join my YouTube membership!
Check my playlist on DWIN displays!

Buy DWIN displays using my affiliate link to support my work!