Arduino menu navigation with rotary encoder and LCD
In this video I share some ideas about how you can navigate in a menu with a rotary encoder. With a simple setup such as an Arduino, an LCD and a rotary encoder, you can do a lot of things. I use a few LEDs to show you how you can navigate across a menu, and how you can activate/deactivate functions. The provided example can be extended or modified easily to your own requirements.
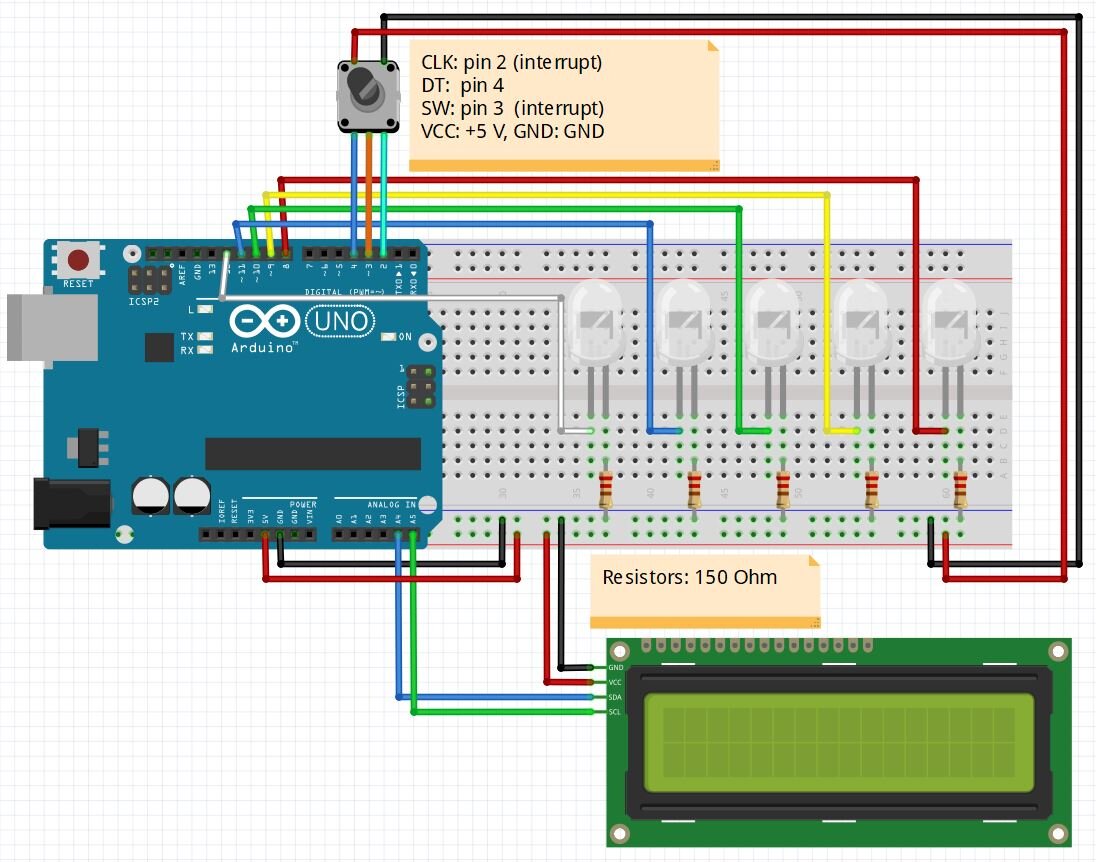
Wiring diagram
The five LEDs represent the different options selected within the menu. The color of the cable represents the color of the LED. The LCD uses the i2C protocol, so it uses 2 analog pins (A4: SDA, A5: SCK), plus the +5 V and GND connections. I added 150 Ohm resistor to all LEDs, however, some of them would run better with different values. Use some online calculators to get the optimal values for each LED.
Arduino source code
//16x2 LCD
#include <LiquidCrystal_I2C.h> //SDA = A4, SCL = A5
LiquidCrystal_I2C lcd(0x27, 16, 2);


//Defining pins for rotary encoder
const int RotaryCLK = 2; //CLK pin on the rotary encoder
const int RotaryDT = 4; //DT pin on the rotary encoder
const int RotarySW = 3; //SW pin on the rotary encoder (Button function)

//Defining variables for rotary encoder and button
int ButtonCounter = 0; //counts the button clicks
int RotateCounter = 0; //counts the rotation clicks
bool rotated = true; //info of the rotation
bool ButtonPressed = false; //info of the button

//Statuses
int CLKNow;
int CLKPrevious;
int DTNow;
int DTPrevious;

// Timers
float TimeNow1;
float TimeNow2;

//LED things
//digital pins
const int whiteLED = 8;
const int blueLED = 9;
const int greenLED = 10;
const int yellowLED = 11;
const int redLED = 12;
//statuses (1/true: ON, 0/false: OFF)
bool whiteLEDStatus = false;
bool blueLEDStatus = false;
bool greenLEDStatus = false;
bool yellowLEDStatus = false;
bool redLEDStatus = false;
//------------------------------

//Drawing of the LCD layout
//W  B  G  Y  R   CLK
//0  0  0  0  0    1


void setup()
{

 	 //Serial.begin(9600); //we don't use the serial in this example

	//------------------------------------------------------
	lcd.begin();                      // initialize the lcd
	lcd.backlight();
	//------------------------------------------------------
  lcd.setCursor(0,0); //Defining position to write from first row, first column .
  lcd.print("W B G Y R  CLK");
  lcd.setCursor(0,1); //second line, 1st block
  lcd.print("0 0 0 0 0   0"); //You can write 16 Characters per line .
  delay(3000); //wait 3 sec
  //------------------------------------------------------
   //setting up pins
   pinMode(2, INPUT_PULLUP);
   pinMode(3, INPUT_PULLUP);
   pinMode(4, INPUT_PULLUP);

   pinMode(whiteLED, OUTPUT); //white LED
   pinMode(blueLED, OUTPUT); //blue LED
   pinMode(greenLED, OUTPUT); //green LED
   pinMode(yellowLED, OUTPUT); //yellow LED
   pinMode(redLED, OUTPUT); //red LED

	//LOW pins = LEDs are off. (LED + is connected to the digital pin)
   digitalWrite(whiteLED, LOW);
   digitalWrite(blueLED, LOW);
   digitalWrite(greenLED, LOW);
   digitalWrite(yellowLED, LOW);
   digitalWrite(redLED, LOW);


  //Store states
  CLKPrevious = digitalRead(RotaryCLK);
  DTPrevious = digitalRead(RotaryDT);

  attachInterrupt(digitalPinToInterrupt(RotaryCLK), rotate, CHANGE);
  attachInterrupt(digitalPinToInterrupt(RotarySW), buttonPressed, FALLING); //either falling or rising but never "change".

  TimeNow1 = millis(); //Start timer 1
}


void loop()
{
  printLCD();
  ButtonChecker();
}

void buttonPressed()
{
  //This timer is a "software debounce". It is not the most effective solution, but it works
  TimeNow2 = millis();
  if(TimeNow2 - TimeNow1 > 500)
  {
    ButtonPressed = true;
  }
  TimeNow1 = millis();  //"reset" timer; the next 500 ms is counted from this moment
}

void rotate()
{
  CLKNow = digitalRead(RotaryCLK); //Read the state of the CLK pin

  // If last and current state of CLK are different, then a pulse occurred
    if (CLKNow != CLKPrevious  && CLKNow == 1)
    {
    // If the DT state is different than the CLK state then
    // the encoder is rotating CCW so increase
      if (digitalRead(RotaryDT) != CLKNow)
      {
      RotateCounter++;

      if(RotateCounter > 4)
      {
       RotateCounter = 0;
      }

      }
      else
      {
      RotateCounter--;

      if(RotateCounter < 0)
      {
        RotateCounter = 4;
      }

      }
    }

  CLKPrevious = CLKNow;  // Store last CLK state
  rotated = true;
}


void printLCD()
{
    if(rotated == true) //refresh the CLK
    {
      lcd.setCursor(12,1);
      lcd.print(RotateCounter);
      rotated = false;
    }

}


void ButtonChecker() //this is basically the menu part. keep track of the buttonpressed and rotatecounter for navigation
{
  if(ButtonPressed == true)
  {
    switch(RotateCounter)
    {
      case 0:
      if(whiteLEDStatus == false)
      {
        whiteLEDStatus = true;
        digitalWrite(whiteLED, HIGH); //white LED is turned ON
      }
      else
      {
        whiteLEDStatus = false;
        digitalWrite(whiteLED, LOW); //white LED is turned OFF
      }

      lcd.setCursor(0,1); // Defining positon to write from second row, first column .
      lcd.print(whiteLEDStatus);

      break;

      case 1:
      if(blueLEDStatus == false)
      {
        blueLEDStatus = true;
        digitalWrite(blueLED, HIGH);

      }
      else
      {
        blueLEDStatus = false;
        digitalWrite(blueLED, LOW);
      }

      lcd.setCursor(2,1); // Defining positon to write from second row, first column .
      lcd.print(blueLEDStatus);
      break;

      case 2:
      if(greenLEDStatus == false)
      {
        greenLEDStatus = true;
        digitalWrite(greenLED, HIGH);

      }
      else
      {
        greenLEDStatus = false;
        digitalWrite(greenLED, LOW);
      }

      lcd.setCursor(4,1); // Defining positon to write from second row, first column .
      lcd.print(greenLEDStatus);
      break;

      case 3:
      if(yellowLEDStatus == false)
      {
        yellowLEDStatus = true;
        digitalWrite(yellowLED, HIGH);
      }
      else
      {
        yellowLEDStatus = false;
        digitalWrite(yellowLED, LOW);
      }
      lcd.setCursor(6,1); // Defining positon to write from second row, first column .
      lcd.print(yellowLEDStatus);

      break;

      case 4:
      if(redLEDStatus == false)
      {
        redLEDStatus = true;
        digitalWrite(redLED, HIGH);

      }
      else
      {
        redLEDStatus = false;
        digitalWrite(redLED, LOW);
      }

      lcd.setCursor(8,1); // Defining positon to write from second row, first column .
      lcd.print(redLEDStatus);
      break;
    }
  }
  ButtonPressed = false; //reset this variable
}
