Stepper motor control with buttons and rotary encoder
In this video I show you how to control your stepper motor using 2 buttons (direction control) and a rotary encoder (speed control). The code is relatively short and simple. I used the AccelStepper library as usual.
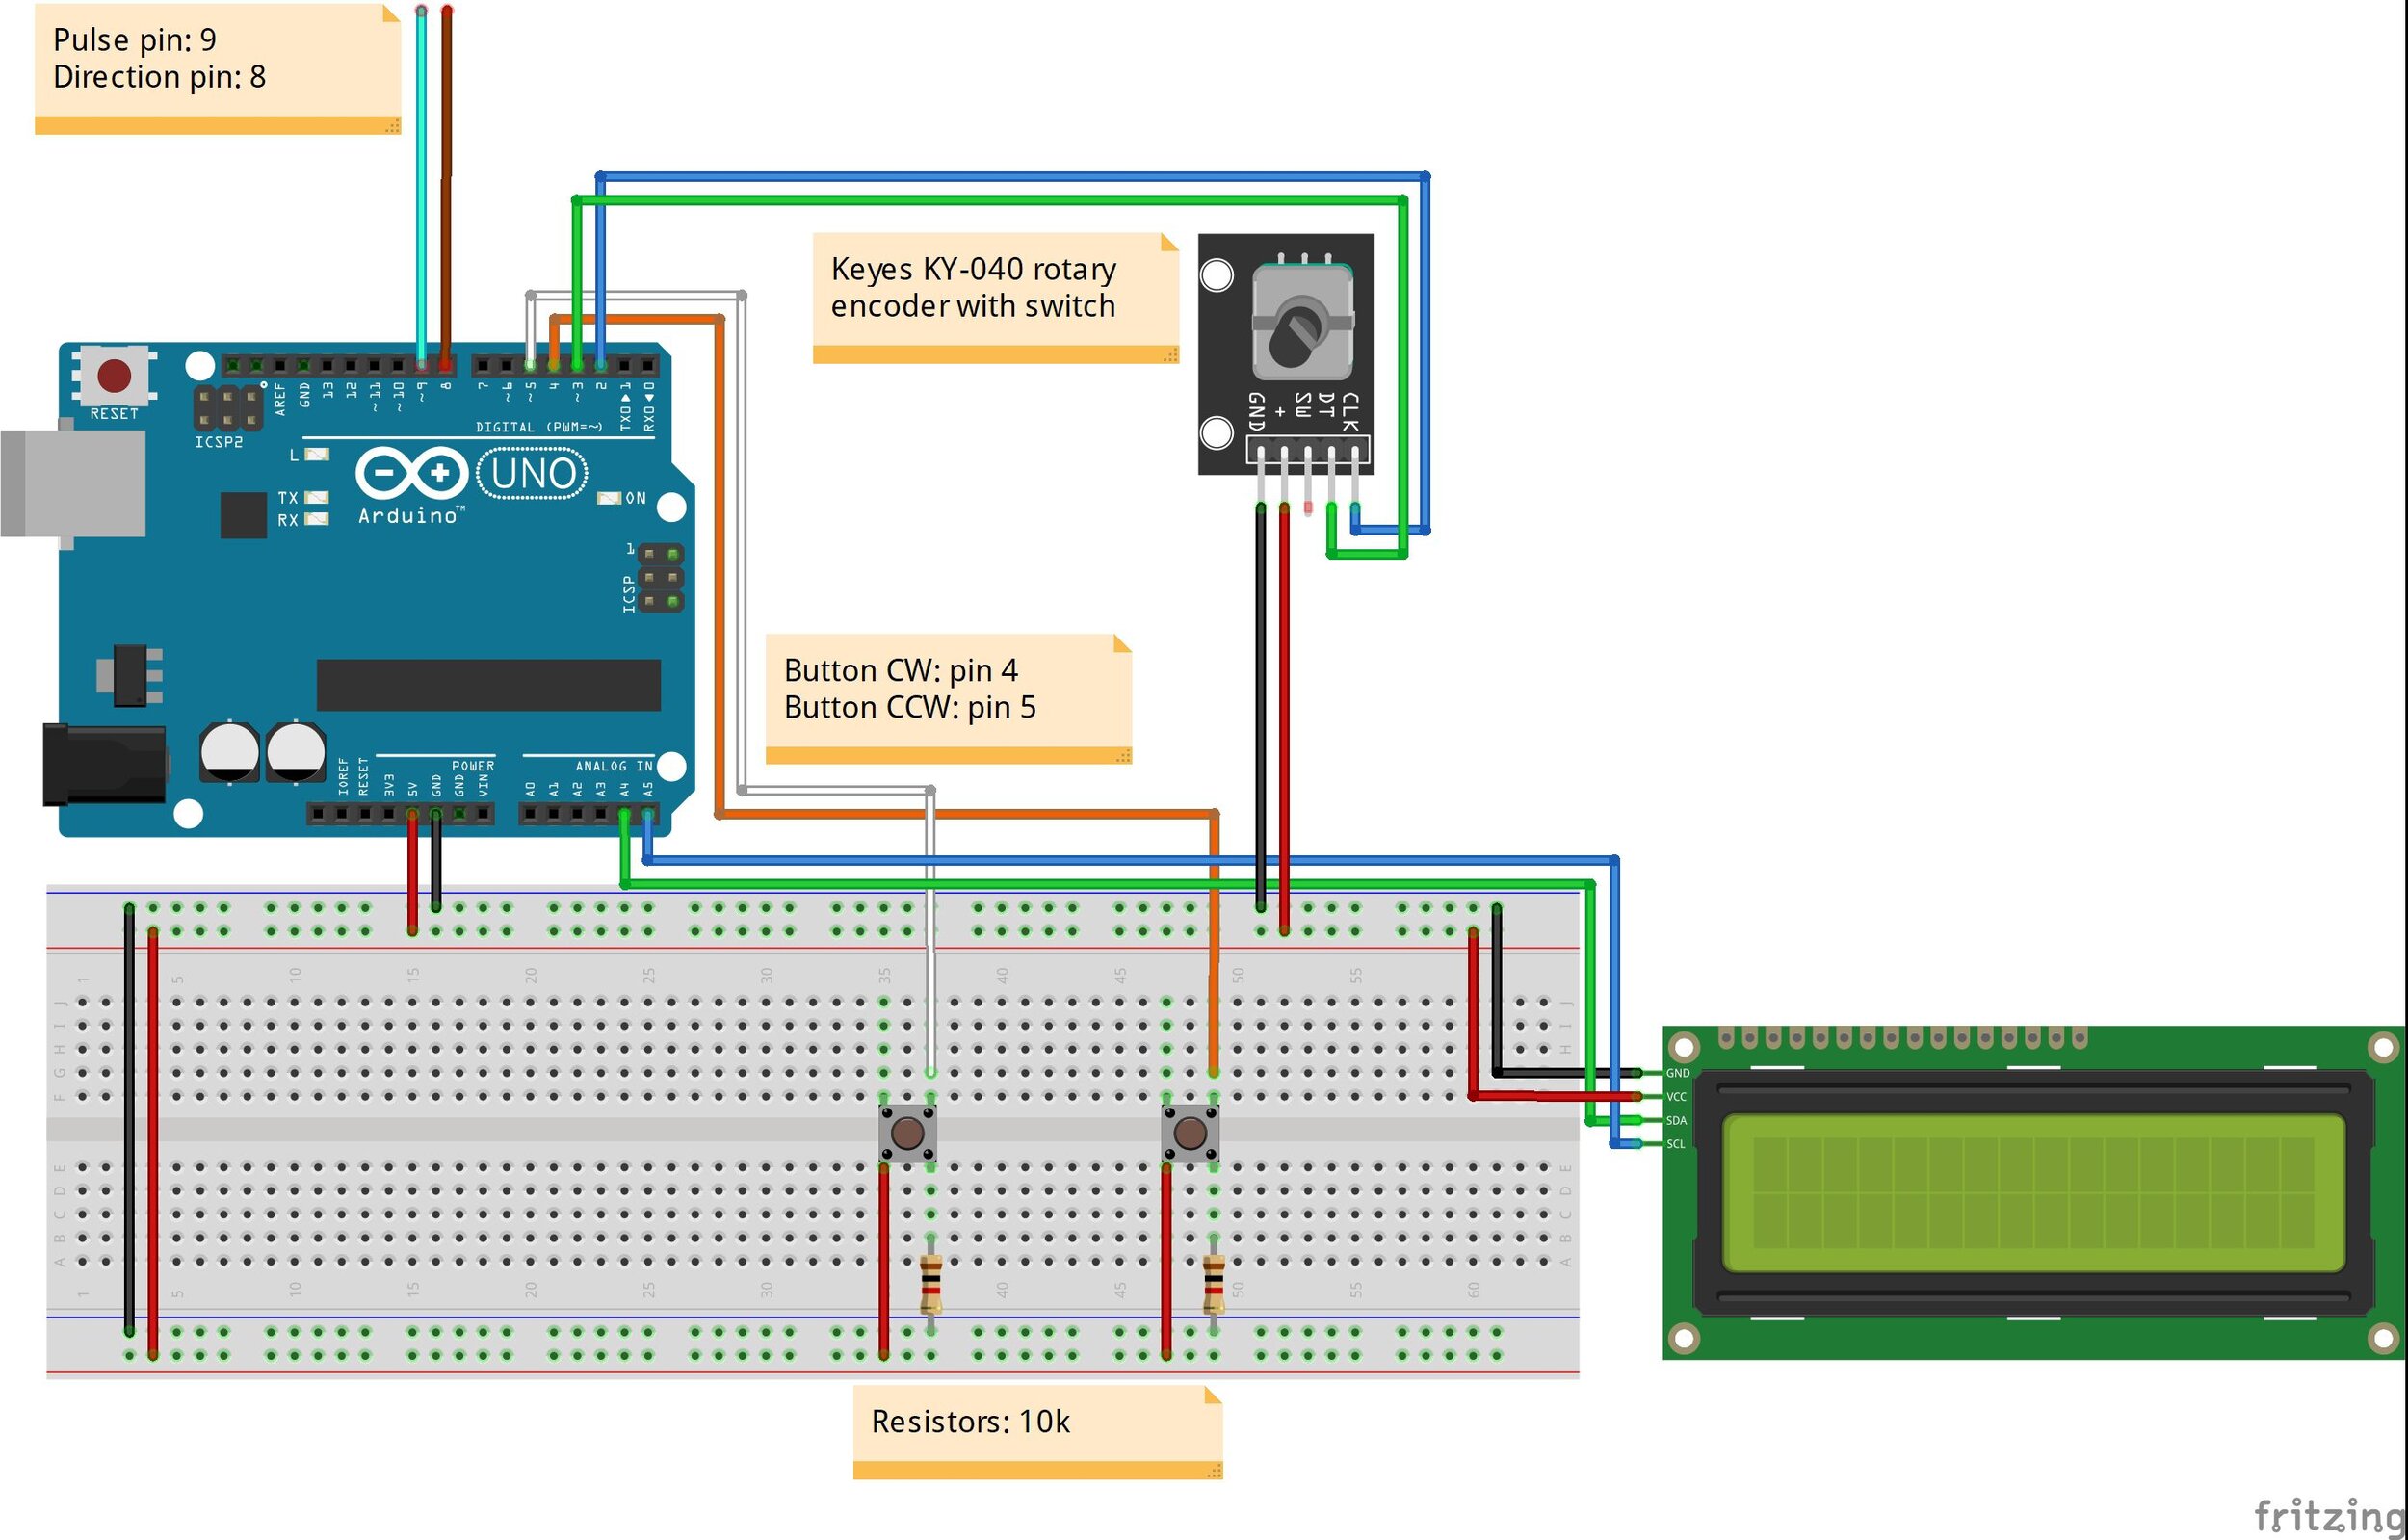
The schematics of the circuit used in the demonstration. The TB6600 stepper motor driver was not added to the drawing but only the step and direction wires coming from the Arduino. The TB6600 can be exchanged with an Easy Driver or a DRV8825 or an A4988 stepper motor driver. All four drivers work with the same principle, therefore they just need the step and direction signals from the microcontroller and that’s all.
Arduino source code
#include <AccelStepper.h> //AccelStepper library
AccelStepper stepper(1, 9, 8);// pulses Digital 9 (CLK); Direction Digital 8 (CCW)

//16x2 LCD
#include <LiquidCrystal_I2C.h> //SDA = A4, SCL = A5
LiquidCrystal_I2C lcd(0x27, 16, 2);


//Defining pins
const int RotaryCLK = 2; //CLK pin on the rotary encoder
const int RotaryDT = 3; //DT pin on the rotary encoder
const int ButtonCW = 4; //Button for clockwise rotation
const int ButtonCCW = 5; //Button for counterclockwise rotation

//Defining variables
int RotateCounter = 0; //initial position
int MotorSpeed = 50; //some default value for steps/s

//Statuses
int CLKNow;
int CLKPrevious;

int DTNow;
int DTPrevious;

// Time
float TimeNow1;
float TimeNow2;

void setup()
{

  Serial.begin(9600);

    //------------------------------------------------------
    lcd.init();                      // initialize the lcd
    lcd.init();
    lcd.backlight();
    //------------------------------------------------------
  lcd.setCursor(0,0); //Defining positon to write from first row,first column .
  lcd.print("Button stepping with");
  lcd.setCursor(0,1);
  lcd.print("AccelStepper()"); //You can write 16 Characters per line .
  delay(1000); //wait 1 sec
  //------------------------------------------------------

   pinMode(2, INPUT_PULLUP); //we use the internal pullup resistor
   pinMode(3, INPUT_PULLUP);
   pinMode(4, INPUT); //CW button
   pinMode(5, INPUT); //CCW button

  //Store states
  CLKPrevious = digitalRead(RotaryCLK);
  DTPrevious = digitalRead(RotaryDT);

  attachInterrupt(digitalPinToInterrupt(RotaryCLK), rotate, CHANGE);

  stepper.setMaxSpeed(1000); //SPEED = Steps / second
  stepper.setAcceleration(5000); //ACCELERATION = Steps /(second)^2

  printLCD(); //Print the things on the LCD
  TimeNow1 = millis(); //Start time

}


void loop()
{
  //The motor only runs when one of the buttons are kept pressed

  CheckButtons(); //Checking the status of the buttons

  RunTheMotor(); //Running the motor


  TimeNow2 = millis();

  if(TimeNow2 - TimeNow1 > 200) //if the time difference is more than 200 ms (increase the number to print to the LCD less often)
  {
    updateLCD(); //Printing LCD (This slows down the stepping significantly, so use it less frequently)
    TimeNow1 = millis();
  }

}


void updateLCD()
{
  //this function only updates the necessary parts
  lcd.setCursor(7,0);
  lcd.print("   "); //first we clear the area with spaces (it is important when you show a 3-digit number after a 4-digit number)
  lcd.setCursor(7,0);
  lcd.print(MotorSpeed);    //Print the speed

  lcd.setCursor(10,1);
  lcd.print("      ");
  lcd.setCursor(10,1);
  lcd.print(stepper.currentPosition());    //Print the number of steps done from the origin (i.e. the position)
}

void printLCD()
{
    lcd.setCursor(0,0); // Defining position to write from first row, first column .
    lcd.print("Speed: ");
    lcd.setCursor(8,0);
    lcd.print("        ");
    lcd.setCursor(8,0);
    lcd.print(MotorSpeed);    //Print the speed

    lcd.setCursor(0,1); // Defining position to write from second row, first column .
    lcd.print("Position: ");
    lcd.setCursor(10,1);
    lcd.print("      ");
    lcd.setCursor(10,1);
    lcd.print(stepper.currentPosition());    //Print the number of pulses

}


void RunTheMotor() //function for the motor
{
    stepper.enableOutputs(); //enable pins
    stepper.moveTo(RotateCounter); //tell the stepper to move to the 'RotateCounter'steps (absolute) position

    while(stepper.distanceToGo() != 0)
    {
      stepper.setSpeed(MotorSpeed);
      stepper.runSpeedToPosition();

      //Serial.print("DistanceToGo: "); //for debugging
      //Serial.println(stepper.distanceToGo());
    }
    //Serial.println(MotorSpeed); //for debugging
}

void CheckButtons()
{
  //Serial.println(digitalRead(ButtonCW)); //Just for debugging
  if(digitalRead(ButtonCW) == HIGH) //if the button is pressed
  {
    RotateCounter++; //increase the value of the variable, this represents the absolute position of the stepper

   // Serial.print("ButtonCW: "); //for debugging
   // Serial.println(stepper.distanceToGo());

    //you can add delay here which is also a type of debouncing. It is useful when you want to click the button
    //once and increase the steps (value of RotateCounter) only by one.
    //delay(100); //Simplest thing to be able to use this function to add just 1 step at a time to use delay
  }
  //Serial.println(digitalRead(ButtonCCW)); //Just for debugging
  if(digitalRead(ButtonCCW) == HIGH)
  {
    RotateCounter--; //decrease the value of the variable, this represents the absolute position of the stepper

    //Serial.print("ButtonCCW: "); //for debugging
   // Serial.println(stepper.distanceToGo());
    //delay(100);
  }
}

void rotate()
{
  CLKNow = digitalRead(RotaryCLK); //Read the state of the CLK pin

  // If last and current state of CLK are different, then a pulse occurred
  if (CLKNow != CLKPrevious  && CLKNow == 1)
  {
    // If the DT state is different than the CLK state then
    // the encoder is rotating CCW so increase
    if (digitalRead(RotaryDT) != CLKNow)
    {
      MotorSpeed++;
    }
    else
    {
      // Encoder is rotating CW so decrease
      MotorSpeed--;
    }
    stepper.setSpeed(MotorSpeed); //as this functions is not started from the loop() it is maybe good to update the speed here
  }
  CLKPrevious = CLKNow;  // Store last CLK state
}